Passion for Precision

Saturday, April 30, 2011

HASEGAWA SPACE SHUTTLE AND HUBBLE SPACE TELESCOPE - SEEING THE EDGE OF THE UNIVERSE


Mat Irvine sees stars
Getting a new lease of life out of an existing kit is hardly unusual, and this is precisely what Hasegawa has done with its 1:200 scale Space Shuttle Orbiter kit, by adding what was the Shuttle’s largest single payload, the Hubble Space Telescope (HST). What is odd, given the number of Orbiter kits and the importance of this particular space observatory, is that no-one has done this before.


A multi-coloured kit, split usefully into related groups. The runner of grey components is newly produced for this kit.


Space-saving scale
The use of 1:200 scale is based on the simple fact that Hasegawa uses this scale for its airliner kits, rather like Airfix choosing 1:144 scale for its rockets and airliners. However, the scale does mean a small and somewhat simplified kit, but it’s none the less worthy for that, and has the advantage (given the recent article about displaying models) that it takes up minimal shelf space!


The two primary configurations on their respective stands.

You have two options - build the HST as a free flyer, perched on the same type of base that Hasegawa supplies for its cartoon-style Egg Planes, with the Orbiter separate. Or you can attach the HST to the Orbiter’s cargo bay cradle, as was the case during servicing missions. 

Which mission?
The HST was involved with six Shuttle missions, the first for launch, STS-31 (Discovery) in 1990. Then there were five Service Missions, somewhat confusingly numbered 1, 2, 3A, 3B and 4. However, only the last two are relevant here, as Hasegawa’s HST solar panel configuration matches only STS-109 (Columbia) in March 2002, or STS-125 (Atlantis) in May 2009, the final Service Mission. 


The decal photo-sheet is split into convenient sections.

Challenge of the tiles
The way in which the heat-resistant tiles on the Orbiters can be represented has long challenged modellers to get them looking correct. To this end, several manufacturers have made sets of decals that do much of the hard work. Most of these are these are no longer available, but as they used computerized designs, they were rather ‘too precise’. 


Tiles applied, looking extremely used. The big hole is for the stand!

Photo solution
But there is another solution - space model expert Keith McNeill has cleverly taken actual Orbiter images, and hence the correct tile pattern, (or perhaps to be more precise, ‘one of’ the correct tile patterns), and converted them into decal form. Keith will make them to order - check his website below - and in most of the common Orbiter scales, so you just need to choose. A set in 1:200 scale was used here, and they look very effective - mainly because they are photos of the real thing!


This configuration makes the sheer size of the HST apparent.


Thanks to Hobby Link Japan for the review kit.

Visit the Hubble Space Telescope here.

For Shuttle tile decals, email Keith McNeill via his website here.


Friday, April 29, 2011

BEST WISHES TO PRINCE WILLIAM AND KATE MIDDLETON ON THIS ROYAL WEDDING DAY


SMN report
We’ll be joining the two billion or so TV viewers later today, but there’s just time for a quick look at some of the aircraft flown by British royalty - who knows, there might be a model there somewhere, perhaps a Westland Sea King like the above.


Prince William is a serving Royal Air Force officer, flying Sea King Search and Rescue helicopters. To the best of SMN’s knowledge, there are no special ‘royal’ markings, but the helicopter makes an attractive model in any scale, though here’s a request to manufacturers out there - how about a really BIG Sea King? The largest we know of is the Bravo Delta 406 mm (16 in) long mahogany display model, though it’s not cheap, and made to the somewhat odd 1:42 scale. The Sea King is a popular machine that’s been around for more than three decades, and that’s without mentioning the original Sikorsky S-61, from which the Westland version was developed. Plenty of scope there then!


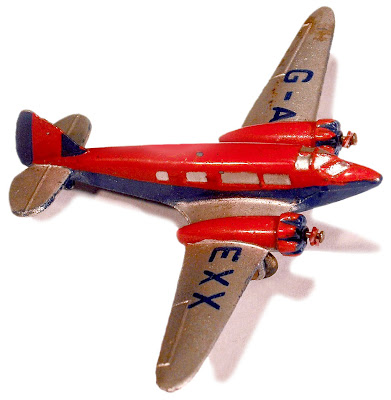
King’s Flight Airspeed Envoy III in Dinky Toy model form.

King’s flight formed
Dedicated royal aircraft go back to 1936, when the King’s Flight was formed, using Edward VIII’s own de Havilland Dragon Rapide biplane. The following year it was replaced by a streamlined monoplane, a twin-engine Airspeed Envoy III. The Envoy was painted in suitably royal red and blue, and this was captured neatly by Dinky Toys, including the registration mark G-AEXX. The Dinky Envoy was produced in various colour schemes, from 1938-1941. The picture here, kindly supplied by Andy Dingley, shows the model as it is today, a survivor from the days of the British Empire, more than 70 years ago. 

Time to buy?
Prices for collectibles like this vary hugely, depending on rarity and condition. A recent Envoy in blue, complete with propellers, went for the very affordable £42.55 GBP ($70.82 USD). A Royal Envoy in similar condition could fetch much more, especially with its propellers on, which the one we show here lacks.


For a cheapo bit of memorabilia, how about a contemporary cigarette card? This one is for sale on eBay, price at this moment just £2.48 GBP ($4.1 USD).


Aircraft operated by No 32 (The Royal) Squadron include the BAe 146 and HS 125.

Royal aircraft today
Coming up to date, there is no longer a dedicated King or Queen’s Flight. Instead, the task is undertaken by No 32 (The Royal) Squadron, and the days of brightly-coloured royal aircraft are gone too. Thanks to perceived threats from terrorists and the like, aircraft are now finished in plain, relatively anonymous markings. Something of a shame there, and a sad reflection on the times. So for model makers, the best aircraft to pick go back a few years, and these are the ones we show here.


If you watch, visit, or take part in the Royal Wedding today, enjoy!

Pix courtesy Andy Dingley, RAF.

Visit Bravo Delta here.

Visit eBay cigarette card on sale here.


Thursday, April 28, 2011

DUST IS THE ENEMY - DEFEAT IT WITH STORAGE SOLUTIONS


David Jefferis on ways to crack a problem
Once upon a time, my model gang used to meet up on Saturday mornings, pack-hunting for the latest model kit. When we’d parted with our pocket money, off to our homes we’d go, aiming to vote for the best-made model a few days later. Once homework and household chores were done, out came the cement, craft knife, and other tools needed to assemble that object of desire as neatly as possible.


A taster-size three-bottle port set formed this over-the-door storage solution. It’s supported by the door surround, and a single nail in the plasterboard wall.


Danger on display
Once it was assembled and painted, I’d proudly put the finished model on the display shelf - and that’s when the trouble started, because within a week, that shelf needed dusting. And not only the shelf, but the delicate fine parts on my latest model - windows, doors, flaps, pitot tubes, canopies, guns, aerials, antennas - had collected their share of dust, too. I won’t go into the torment of seeing the damage resulting from adult Speedy Gonzales dusting sessions!

The problem was addressed eventually by the installation of a large multi-shelf corner cupboard. Without a glass door, those models were effectively invisible most of the time, but at least they didn’t collect quite as much dust, and it was easier to keep house-proud hands away. So problem - mostly - solved.


This item originally came from an art supplies shop, later liberated from my daughter after the beads and sequins in the compartments were used up.


Defeating dust
Here in 2011, dust remains an enemy, so here are some suggestions for keeping your collection pristine, with an emphasis on speed and cheapness. First off, keep those wooden bottle-boxes you see on special occasions, especially at Christmas. Every one can be repurposed as a useful display unit, albeit one that’s most suited for vehicles, figures or other small items. I first remove any lining or string, give the box a quick once-over with fine glasspaper, then spray with suitable paint. White aerosol primer gives a clean finish, looks good, and sets off colours particularly well.

Store it anywhere
The great thing about small storage like this is that you put a shelf up almost anywhere - over a door, in a corner, on a wall - if there's some space, you can use it, and normally the only fixing needed is a small nail or screw. With one of these at the top, plus a pair of small rubber feet at the lower edge to keep things stable laterally, you have a neat display cabinet. No glass front for sure, but very little dust seems to collect in those mini-shelf zones.


Eat the chocs first first, then use the box!

Tastes good and looks good
Next idea is to use the plastic containers that chocolates come in - Ferrero Rocher is a brand which tastes good, and comes in a variety of useful transparent boxes. The pyramid shown here was an Easter Collection presentation. In this instance, I paired a racing truck and a Mini on a black square of card, adding the racetrack picture behind to supply some atmosphere.


Black card for the base, and two neatly parked vehicles.


Open the box! No diamonds inside, but an attractive Hot Wheels diecast instead.

Secret store
What about really small items? I have quite a few concept- and dream-car diecasts in my collection, mostly Hot Wheels made to the standard, if rather nominal, 1:64 scale. They are neat models in their own right, and often represent unique vehicles which are not modelled elsewhere. The example shown here is ‘Fast Fuse’, a sort of 1960s-era custom fantasy, crossed with a hot rod-style exposed engine. Very nice too, and I found a small sweet-tin for it - just the right size to present as a ‘mystery box’ for inquisitive visitors to inspect. 


I added a black silk lining to make the interior somewhat special, and to protect the car's paint finish.


Away with adhesive
I needed to get rid of a particularly sticky label on the lid before I could press the tin into service. My normal routine is to get rid of the paper part of the label by soaking with hot water, which is the easy bit. Removing the adhesive is usually more difficult, as high-tack compounds are used to help defeat shoplifters.  The best solution I have found is to melt as much adhesive as possible with hot water (don’t scald yourself though) then carefully clean off the residue with a wipe soaked in lighter fluid, a product that comes in useful for all sorts of minor cleaning jobs.

I’ll be looking at cheap or free solutions for storing bigger models in a future article.


Pix courtesy David Jefferis, SMN studio.


Wednesday, April 27, 2011

APPROACHING TOUCHDOWN - AIRFIX 1:72 SCALE VICKERS VALIANT V-BOMBER

SMN report
The Airfix 2011 catalogue promised the Valiant earlier this year (SMN story here), and the 1:72 scale kit is now coming in to land, with general sales expected around May 10. The subject is the four-engine Vickers-Armstrong Valiant jet bomber, developed after World War II to counter the Soviet threat in the early days of the Cold War. The swept-wing Valiant was the first design to fly of the ‘V-Force’, three British bombers designed to penetrate Soviet airspace and deliver nuclear weapons in the event of the Cold War turning hot. 

In the model world, there has been little shortage of the other two V-bombers, the dramatic-looking Handley-Page Victor, and the big-delta Avro Vulcan, but the comparatively no-frills Valiant has been something of a Cinderella. Still, here we are now with what looks a very interesting kit indeed.


Prototype Valiant about to land at the UK Farnborough Air Show, 1951.


What’s in the box
Boxed in the Airfix latest style, there are 142 components to this 1:72 scale kit of the BK Mk1 version. It should build into a decent sized model, with a wingspan of 488 mm (19.2 in) and length of 456 mm (17.9 in). Detailed undercarriage parts show off the Valiant’s relatively unusual tandem-layout mainwheels, while under the wings are slung the large tanks which boosted the Valiant’s range. Airfix has included decals for four different aircraft, and as now seems to be standard practise, the schemes are available as detailed pdf downloads from the Airfix site. 


Marking schemes available as downloads from Airfix.

Other kits
There have been Valiants before, including the 1:144 scale diecast from Corgi, and kits from Contrail and Mach 2, but this is a mainstream injection kit, and it looks to be well worthwhile. We’re in the queue for this, the BK1 version of the first RAF aircraft to drop a live UK atomic bomb, on test in 1956.


Examples of Mach 2 (front) and Contrail Valiants.


Prototype picture courtesy the Aircraft Engine Historical Society, Inc, here.

Valiant models above, courtesy the forum here.

Visit Airfix for information and marking schemes here.

Online suppliers are taking pre-orders, including Wonderland Models here.


Monday, April 25, 2011

YURI GAGARIN AND THE AIRFIX VOSTOK KIT - MAT IRVINE TALKS KIT UPDATES


Mat Irvine on a question of colour
Further to last week’s report on the Airfix 1:144 scale Vostok kit reissue (see it here) celebrating Yuri Gagarin's famous 1961 flight, as I provided the change of details needed to Airfix, here’s more of an explanation.

Secret Vostok shape
The kit itself was released way back in 1969, when we in the West had only recently found out what this Soviet rocket actually looked like. Although flown as early as 1957 to launch Sputnik 1, it wasn’t until 1965, four years after the Gagarin flight, that the shape was revealed.


The first two Vostok boxes. Bottom is the 1969 original, above is the 1991 version, with my suggested additional wording: ‘Soviet A-Type Launch Vehicle’.

Slimline boosters
Because details were still sketchy even in 1969, the kit was not entirely accurate. To be fair, most of it did come out pretty close, but the main problem was with the four tapered boosters. These were too thin, and made the rocket look sleeker than it actually was. In reality, these boosters are somewhat fatter, making the rocket look more dumpy. Unfortunately it wasn’t possible to correct them in this reissue, but everything else has been sorted, including the colour recommendations. 


New box for the Airfix Vostok launcher. Three configurations are included, but the emphasis is on Yuri Gagarin, as 2011 is the 50th anniversary of his flight, and the box features a commemorative sticker. New Airfix space kits have box art by Mike Trim, who also did designs for early Gerry Anderson TV series.

Green rocket
When the full-size mock-up was first seen, it was painted white, and as most US space launchers were white, it was assumed quite naturally that this was correct, and this was the Airfix recommendation too. However, once photos of the real thing appeared - though most were atrocious quality, and if they were in colour, even more atrocious colour - it was apparent the rocket wasn’t white. Instead, it was a dark camouflage colour, almost certainly green. This made sense, as the rocket was adapted from a missile, which tend to be camouflaged. So the paint instruction then became ‘camouflage green’, and this has been in place for a decade or so now. 


Trying to sort out which grey to suggest, using Humbrol’s colour chip book.

Updating the kit
However, given the task by Airfix to update the introduction and colour schemes for this reissue, I looked into the matter further. One rumour was that the ‘green’ is actually grey. However, most images still looked green, a result it seems of colour bias. Most film stock - we are talking traditional film here - has a bias to one section of the spectrum. Ektachrome tended to be biased toward blue, while Kodachrome went the other way, toward orange. Soviet-era film went towards green, and it appears, extremely so. If the rocket WAS grey, this, on the face of it, the most boring of colours, is actually in many ways the most enigmatic and due to a phenomenon known as metamerism, ‘real colour’ can take on various hues depending on many factors, particularly lighting. So you ended up with the grey of the Vostok launchers being referred to as ‘green’ because that’s how they looked in most photographs. It wasn’t until Western observers started to travel to what is now Russia, and were able to see the rockets directly ‘up close’, it was discovered they were painted grey, not green!


Vostok launcher with the other options, Luna and Soyuz. You get two nameplates - one in Cyrillic lettering (as here) and one in Roman script. The completed launcher is in the accepted ‘grey’ - though, depending on your monitor settings, it may still look green!

Shades of grey
That solved one major problem for me, but introduced another - OK it was grey, but what grey? As the kit was Airfix, and the paint section of Airfix’s owner, Hornby, is Humbrol, the paint recommendation had to be, fairly logically, a Humbrol colour. The slight problem was that Humbrol makes 27 shades of grey, (28 if you include primer), so which shade should I recommend? After a lot of head-scratching, I first ended up with a shortlist of ten, then whittled it down to either 126 US Medium Grey or 156 Dark Camouflage Grey. I was tending towards the former, but then realised that it was close to 27 Matt Sea Grey, which had a clear advantage - it was available not only in Humbrol’s classic tinlet, but also in a spray can. So to make everything easy, the choice for the Vostok, and any similar Russian/Soviet launcher, is Humbrol 27 Matt Sea Grey.

So the rocket is grey - but it can also be white… More on that next time!

See Vostok kit here.

See more in my article on building the Airfix Vostok launcher in Airfix Model World, Issue 5. AMW is here


Friday, April 22, 2011

GIANT-SIZE RUSSIAN T-34 TANK COMING FROM ARMORTEK


David Jefferis reports
The Devon-based Armortek company has announced its latest 1:6 scale AFV model, the Russian T34, in short and long barrel versions. Armortek bills itself as the world’s leading manufacturer of these big-scale kits, with service, reliability, and top build-quality coming with every model.


Design and production methods
The kits are designed using 3D software to produce detailed virtual models, which are then proven by in-house rapid prototyping and manufacturing. Production parts - we’re talking big metal AFVs here - are machined mostly from solid material on multi-axis turning machines and machining centres. 


True to scale
Armortek models feature scale thickness armour and use full-size construction practises when possible, so German tanks feature torsion bar suspension and fabricated hulls and turrets, while Allied vehicles feature volute or leaf springing and cast turrets, just like the real thing.

Uniquely, Armortek uses industrial motors and control gear to bring the models to life. Typically, a tank can run for about 45 minutes per battery charge, and that’s impressive, bearing in mind the sheer size - an Armortek tank weighs in at some 170 kg (340lb) and has full cross-country ability, including climbing 45-degree muddy slopes. 


Smoke and noise
Special-effects packs bring authentic digital sound to the models, all sounds being recorded from the real thing. Smoke generators cough out proportional smoke from engine exhausts, while blank-firing guns provide spectacle in the field. The gunnery unit provides six shots from a magazine mounted inside the turret, using 12-gauge blanks with black powder filling, to give a deep cannon sound - with muzzle flash and plenty of smoke to impress onlookers!


The T34 prototype pictures show the base model in unpainted metal. But of course, correct finishing transforms the appearance completely. Shown above in front of Armortek's base are AFVs that show the sort of realistic appearance it's possible to achieve.

The only downside of it all is price - a finished tank costs about the same as a decentish used car. But if you have the money and enthusiasm, then Armortek should be first port of call. Have a look at the comprehensive website - it’s a mouthwatering temptation for any AFV fan.

Pictures courtesy Armortek.

Visit Armortek here.


Thursday, April 21, 2011

AIRFIX DARRACQ - AN EARLY ‘STAR CAR’


A blast from the past with Mat Irvine
Given the nature of this website, most pieces here tend to be in the ‘what’s new’ category. However, others can turn up by serendipitous coincidence, such as this example. 


Treasure chest of models
I was recently in that modellers’ gold-mine, Comet Miniatures in south London, an establishment run by an old friend of mine, Tony James. Even when I’m sure I know what’s in every nook and cranny, the place can still turn up surprises. I was rummaging about in the ‘second hand’ shop, when all of a sudden I noticed the very first issue of the Airfix 1904 Darracq from 1956, in (of course) a period polythene bag, with paper header containing the instructions. 


French car in a British movie
Why would I be particularly interested in a 1904 Darracq? Well, it was one of the very first ‘Star Cars’ - cars that have had ‘starring roles’ in movies and TV series. And this of course was the automotive star (even though it was a French car) of a classic 1953 British movie Genevieve. The film - its background the annual London-to-Brighton Veteran Car Run - was a smash hit in the UK, although the kit didn’t shout out the connection. Unlike, say, Airfix’s later Goldfinger Aston Martin, it just pointed out the link in a quiet line of text on the back of the header. 


Reissued over the years
As with most Airfix kits, the Darracq has been reissued over the years, and was later transferred into a box - the one here dates from 1975 - plus an added driver figure, although this unfortunately this didn’t match the appearance of John Gregson, the actor who played the driver. The kit didn’t quite match the movie car either, but by making a few additions, painting the correct colour scheme, and using appropriate number plates, I ended up with a more accurate, and very unusual addition to my collection.


A question of scale
There is one other factor that is not immediately apparent. The vast majority of Airfix car kits have been to 1:32 scale, (notable exceptions being the Bond cars). Consequently, although the Darracq is listed as ‘1:32' scale, it is not. In fact, the scale is 1:25, a fact pointed out by American model car expert Dean Milano, mainly as his large collection of car kits are only in 1:24 or 1:25 scale - but he added the Darracq because, as he pointed out: “It fitted in”. 


Various Airfix cars here.

Visit the Genevieve website here.

Visit Comet Miniatures here.

Visit Dean Milano here.

The pictures show, top to bottom:
1  The first issue Airfix 1904 Darracq, dating from 1956.
2  Back of the header sheet, revealing the line about Genevieve. This is almost certainly the second earliest references to a ‘Star Car’ in a model kit.
3  A later, 1975 issue, with the kit now in a conventional box.
4  However, the packaging still mentioned the movie connection, this time on the box side. 
5  A driver figure was included by now, in common with many of the original Airfix veteran car kits.
6-8  The Airfix Darracq, modified ever so slightly into a fair replica of Genevieve.